Uncover easy tips for taking amazing photos of texture with insight from seven industry pros, and make the most of your eye for detail.
As our world becomes more virtual and digitized, there’s something to be said about imagery that captures the shapes, colors, and textures of real life. Photographs showing texture engage more than just our sense of sight; they feel immediate, tangible, and accessible. In recent years, we’ve seen an increase in popularity for these kinds of pictures, with texture-themed keywords like marble, agate, embroidery, guilloche, holographic, grunge, and terrazzo dominating image searches.
Successful photographs of textures require attention to detail and a willingness to think outside the box. We asked seven photographers to share their best advice for creating tactile images. There’s a tip in here for everyone, whether you’re photographing something soft and fuzzy or hard and smooth.
These photographers have various preferred techniques, depending on their subjects; while some choose natural light, others opt to use different kinds of studio lighting ranging from the traditional to the unconventional. Read on to learn what’s right for you.
1. “I use a softbox as the main light source, and for vibrancy, I sometimes add a hard light reflector.”
Nik Merkulov
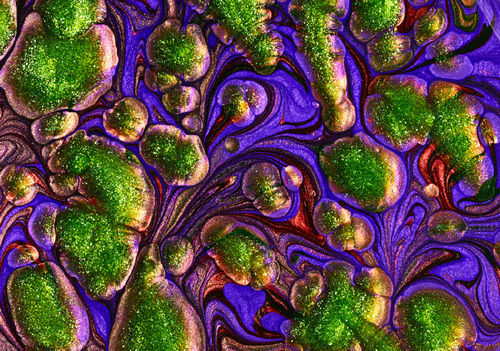
Image by Nik Merkulov. Gear: Canon 5DSR camera, Canon 50mm f2.5 compact macro lens. Settings: Exposure 1/125 sec; f14; ISO 100.
What’s the story behind this photo?
Before I was a photographer, I was a painter, and I’ve always liked mixing different paints. With this new series of paint textures, I could finally unite my passions for photography and painting.
I chose nail varnish as the paint in this photo. They all had different textures, different densities, and different colors, etc. I used purple varnish as a base, and then I introduced some reddish paint. I took a palette knife and started drawing wavy lines to create the main texture.
But something was missing. I chose a sparkly green varnish and started to drip it into my composition, creating a complete picture. The heavier varnish fell to the bottom, and the lighter varnish floated to the top, resembling a miniature universe. It was perfect!
Pro Tip
For extremely sharp, high-quality images, you will need a minimal ISO and wide depth of field, so you will need to close the aperture to around f14-f22. Get a nice light source with high power. I use a softbox as the main light source, and for vibrancy, I sometimes add a hard light reflector. It’s excellent if you have a camera with a high MP sensor; that way, you can examine every pixel of your work. For my texture work, I always have brushes, a palette knife, an acrylic surface, and paper cups on hand
2. “I emphasize shadows with cold colors, and use warm colors to express the light.”
Fotaro1965 (Tanya Rovenskikh)

Image by Fotaro1965 (Tanya Rovenskikh). Gear: Canon Eos 5D Mark II camera, EF 24-105 f/4 L lens. Settings: Focal length 105mm; exposure 1/15 sec; f9; ISO 320.
What’s the story behind this photo?
Before I shoot makeup, I’m always interested in learning about the current trends. Matte lipstick is no longer in fashion; now, it’s got to have a little glitter, a satin finish, or a cranberry color. The main thing is to make sure you have the time to go to the store to buy the cosmetics before the trends have changed. Get them and then run back to the studio.
First, I made a squiggle with a paintbrush on a glass background, but looking at the picture, I saw no shimmer. The lipstick looked matte, and I had a few moments of despair. Then came the realization: the scattering panel of the softbox was the guilty party, as it was giving off a soft reflection. I took out my box with lighting gadgets (flashlights, table lamps, etc.), and I started experimenting with light. Eureka! The lipstick sparkled when I used the flashlight, and I was happy with the result.
Pro Tip
Look for unconventional ways of lighting your subject. When shooting manmade textures, photographers most often use a rectangular softbox (or light from the window) aimed from the rear and a reflector in the front. That way, you’ll get a standard picture, but having experimented with lighting, I’ve come to the conclusion that I like light from a long horizontal strip box more. It gives a beautiful reflection and interesting pattern.
I also like to use two light sources that require different kinds of white color balance. I emphasize shadows with cold colors, and use warm colors to express the light. In my work, I don’t use only professional lighting, but I also use a ring flash and different table lamps-some to disperse light, and others to give hard, direct lighting. Using correct lighting, you can change the emotional perception of any object. Give it a try, and light even a piece of wood with passion!
3. “If you want to photograph a unique texture, start by creating it yourself.”
Mari Dein

Image by Mari Dein. Gear: SONY NEX-5N camera, 18-55 lens. Settings: Focal length 20mm; exposure 1/60 sec; f4; ISO 500.
What’s the story behind this photo?
In fact, I don’t consider myself a photographer but an artist. I paint pictures and then photograph their fragments, resulting in unusual textures. At the beginning of the year, I managed to take a master class on alcohol ink, a technique I had been interested in for a long time.
I was not sure that I would find the right alcohol and ink, and the few lessons I found on the internet did not make me confident that I’d be able to figure it out myself. By taking this master class, I realized that it’s not nearly as scary as I had feared. As they say in Russia, “Fear has big eyes.”
In literally a couple of weeks, I created a triptych using this technique. This is a fragment of my biggest work so far: a painting with a diameter of 1.5 meters. This is actually a repainted version. First, I created a picture and photographed its details. While post-processing, I then repainted it in different ways, finding interesting color combinations and translating them into new works.
Pro Tip
If you want to photograph a unique texture, start by creating it yourself. I also recommend using more than just the standard materials (e.g. oil, acrylic, or watercolor) but also something unusual. I like working with alcohol ink and epoxy. I even know artists who work with olive oil.
For shooting textures, I find that the best light is sunlight. Since the textures have a small relief, and sometimes none at all, sharp shadows are not a problem. I recommend using a lens for macro shooting, as well as special filters for macro shooting. You can also experiment with using a magnifying glass.
Another piece of advice is to forget about white balance, color, and noise. These things can be corrected, if necessary, during post-processing. In this kind of work, there is no such thing as the “right color” or “wrong color.” The main thing to focus on is the composition.
4. “Crop it in different ways, and adjust the colors and brightness. Play with it.”
Alim Yakubov

Image by Alim Yakubov. Gear: Canon EOS 5D Mark II camera, Canon EF100mm f/2.8L Macro IS USM lens. Settings: Exposure 1/125 sec; f8; ISO 100.
What’s the story behind this photo?
As photographers, we are all hunting for the right moment. On the contrary, painters bring their pieces into being stroke-by-stroke, layer-by-layer, gradually moving from the flatness of a blank canvas towards a plenitude of forms, textures, colors, and even smells. I’ve always admired this haste-less creative process, and I enjoy sharing such moments with other artists. I enjoy learning from them and even trying my hand in painting.
This was one such moment when a painter friend of mine was laying the ground for his new piece. The patterns emerging on the canvas caught my attention, so I took out my camera and tried to capture the oil textures and the first hints of color.
Pro Tip
Good lighting is the key to working with textures. Does that mean that studio lighting is obligatory? I would say not. Quite often, I use daylight to take my pictures, and the result is all the more exciting. At the same time, studio lighting can help direct the beams of light in the right way. I mostly use a Canon 100mm macro lens, which allows me to zoom in on objects.
When working with textures, post-processing is crucial. You need to adjust the brightness and contrast, clean up any imperfections, and find the right balance. However, post-processing is not only about technical improvements. There is still a lot of space for creativity. Try to see the same shot from different angles. Crop it in different ways, and adjust the colors and brightness. Play with it. Sometimes you’ll find totally unexpected effects in post-processing or even recreate the whole picture altogether. Eventually, you might end up with a picture you could never have imagined when you started shooting.
5. “For shooting textures, I prefer days that are cloudy but also bright.”
TravelMakerShop
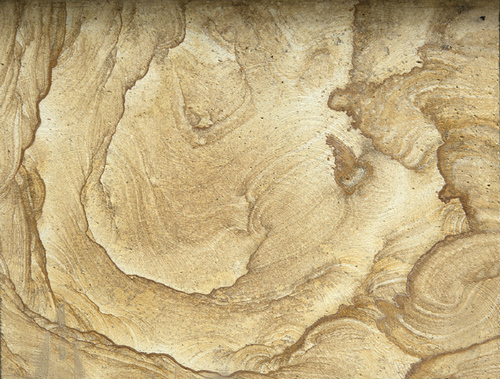
Image by TravelMakerShop. Gear: Canon EOS 6D camera, EF24-105mm f/4L IS USM lens. Settings: Exposure 1/125 sec; f5.6; ISO 200.
What’s the story behind this photo?
This is a natural stone surface. I like working with them to create all sorts of abstractions, and I sometimes create the final image using three to ten or more pictures. For me, they are like a canvas for my compositions.
Pro Tip
We can find interesting photos of textures everywhere, but they often have extra shadows or flat lighting. For shooting textures, I prefer days that are cloudy but also bright. In these conditions, there are absolutely no shadows, all sides of the object are illuminated, and there is good depth and saturation.
When possible, I always use a tripod to help me adjust the depth, exposure, and ISO. I like to focus by hand so I better understand what’s happening in my images and control the outcome. Sometimes, you’ll find new and interesting things that can be done later on your computer screen, but I find that this is rare in my work.
6. “Never be afraid to let your hair down and experiment!”
Shelly Still Photo

Image by Shelly Still Photo. Gear: Canon EOS 750D camera, Canon macro EF-S 60mm lens. Settings: Exposure 1/5 sec; f2.8; ISO 400.
What’s the story behind this photo?
I have a habit of picking up weird textures from charity shops and cheap online clothing shops. This was from a loud sequined dress that I had bought for a laugh to wear at Christmas, but once I saw how the light reflected on the sequins, I grabbed my camera and messed about with the onboard flash and a cheap studio light to catch the colors.
Pro Tip
Never be afraid to let your hair down and experiment! Always keep your eyes peeled for textures. In the past, I’ve even created some great abstract photos from the foil inside a butter packet.
I’m quite erratic when photographing. I like to work very close up and experiment with different lighting and camera angles. I don’t have a permanent setup, just a big piece of black velvet fabric (my essential tool), a few cheap lights on tripods, a flashlight, and the onboard flash.
I work with autofocus and manual, and run up and down the f-number. I’m often feeling a vibe rather than concentrating on composition, and sometimes the best shot can be half-blurred.
7. “When it comes to photographing textures, I have one piece of advice: touch them!”
Michal Durinik
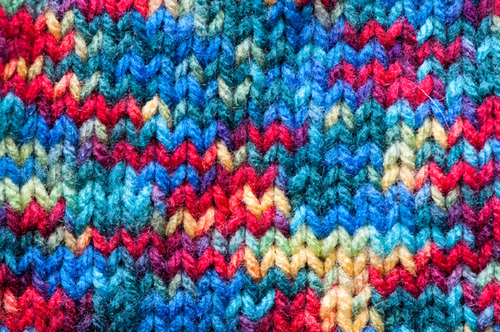
Image by Michal Durinik. Gear: Nikon D7000 camera, Nikkor 105/2.8 Micro lens. Settings: Exposure 1/200 sec; f5.6; ISO 200.
What’s the story behind this photo?
This photo is among my personal favorites. This is a sweater my mom knitted years ago, and each time I look at this photo, I think of her and that funky, colorful, ill-fitting sweater. The photo speaks to me about softness and warmth in every way.
Pro Tip
For me, photography is not about the cameras, lenses, strobes, and space-age tripods. These are important tools, but they’re completely useless unless you use the best tool you have: your mind. Being mindful throughout your day will help you take better photos, as you’ll start noticing things that you would have missed previously.
When it comes to photographing textures, I have one piece of advice: touch them! When you feel a carpet of soft moss in the forest or the cold and slippery surface of a beached iceberg, you’ll have a bodily experience of that texture. This will then help you communicate the right feeling through your photographs.
When you’re trying to have some fun shooting textures (and you definitely should be having fun!), experiment with colored lights. You can build these easily yourself by sticking a piece of colored plastic over your off-camera flash.


